Friday, November 30, 2012

High 5 For Friday


1. I found this glittery stag on Pinterest and had to make my own.  I love it!
2. This Target brand spin off of Starbucks chilled coffee in Gingerbread was pretty good.
3. I was responsible for feeding our cows this week since Adam was hunting, these girls are hungry in the mornings!
4. Old Navy is having a great sale thru Dec. 1 - 30% off your purchase plus a FREE tote bag! It was a pleasant surprise!  This may become my new gym bag.
5. This week I help to decorate a design clients house for Christmas since her home will be showcased on a tour of homes.  It was fun to work with the family and her home looks great for the open house!

I hope you all had a great week too! :)

Remember to stop over at From My Grey Desk to see more High Five posts!


Wednesday, November 28, 2012

Makeup Tip: Eyebrows

This makeup tip will rock your world!  Shaping your eyebrows is super easy and makes a huge impact on your finished look! All you need is the right color of eye shadow and an eyeliner/eye shadow brush.

Here are the guidelines for selecting the right eye shadow to shape your brows.


Here's how you shape your brows


Your brows show extend across the entire length of your eye.

Point 1 is where your brow should start on the inside of your yet.
Point 2 is the arch in your brow.  This should be over the center of your eye and should be the highest point.
Point 3 is where your brow should end, the outside of your eye.

In my case, I use Hazelnut and primarily need to fill in from the arch of my brow to the outside of my eye.  I actually need to extend my brows just a little bit because they get pretty light on the outside.


And your done!  Super easy with an instant difference!!


Here is what you need with links to the products!


Mary Kay Specials ONLY for Design Your Dwelling readers! :)

DYD READER SPECIAL:  10% off your total purchase, use the DYD as your promo code. www.marykay.com/kenz.kral

FREE SHIPPING:  Automatic free shipping on orders of $20 or more!

*You wont see the discount when it's it your basket, Kenzie will apply it for you,make sure to use the promo codes.
**Orders need to be placed via the website and paid with debit or credit

Tuesday, November 27, 2012

Makeup Tip: Contouring, Highlighting & Blush


Did you know that the most appealing face-shape to look at is oval?  Neither did I until I learned about contouring and highlighting. No wonder Carrie Underwood is so dang beautiful!

The shape of your face doesn't really matter, you're still beautiful! :)

To create the illusion of an oval-shaped face you can contour and highlight, which isn't as hard as you might think it is - I'll share the "how-to."

What you need to contour and highlight: 


Contouring

Contouring makes your face look thinner by shading the outer areas of your face. Keep in mind that dark pushes in so to contour you should use a mineral powder that is a half shade darker than your foundation.

Remember I said that an oval-shaped face is the most appealing to look at?  The best way to determine where to contour is to create an oval shape with your hands on your face.


My face-shape is more square and I have a very distinct jaw line, so I need to contour, or shade, the area of my face that are outside of the oval.  This will be different for everyone so make sure to visualize the oval shape on your face.


Everything behind the arrow is shaded in with Mary Kay Mineral Powder Foundation because that is the area outside of the oval.

Remember, dark pushes in, making your face look thinner.  It's kind of like wearing black - it's a slimming color.

Contouring might not be an every-day thing, but maybe more of a special occasion thing!


Highlighting

Highlighting does the opposite of contouring. Highlighting helps to accentuate your features!  The areas on your face you want to highlight are the top of your cheek bones and your brow bone. 

The dots on her face represent the angle that you want to apply the highlighter to accentuate your brow bone and cheek bone.


Using the angled blush brush from the MK brush collection, sweep the mineral highlighting powder from your brow to the top of your cheek bone with a sharp v-shape.


The MK highlighting powder in pink stardust is like magic - one of my absolute favorite products.  It makes such an impact on your overall look by creating sharp features - I love it!  You can also use it as a straight blush or use the white shimmer to brighten the inside corner of your eye.

Blush

Finally, let's talk blush!  It wasn't until a couple of years ago that I started to wear blush regularly and now my make-up routine doesn't go without it.  My go-to blush color is Shy Blush.


To apply blush, start back by your ear.  Your blush should be darkest here. (Remember dark pushes in?!)


Think of an imaginary line from your nose to your ear lobe, blush should not go below that line or it will pull your face down.  Using your angled blush brush, draw a straight line to your cheek and then angle up in a v-shape to just below your cheek bone, just like the arrows show, and fill in your "v."    The blush will magically lay underneath the mineral highlighter.


Here is how your blush should look.  Darker by your ear, lighter on your cheeks.  Since you created a blank canvas with foundation, blush is how you bring color back to your face. Ultimately blush should give you a lightly flushed look.


Here is a look at the contouring, highlighting, and blush all together. (Sorry for the blurry picture...) 

This all sounds like a lot of work but its actually really simple and goes pretty quick once you get the hang of it.  


Here's the list of products I used to contour, highlight and apply blush.  All products are linked. 


Mary Kay Specials ONLY for Design Your Dwelling readers! :)


DYD READER SPECIAL:  10% off your total purchase, use the DYD as your promo code. www.marykay.com/kenz.kral

FREE SHIPPING:  Automatic free shipping on orders of $20 or more!

*You wont see the discount when it's it your basket, Kenzie will apply it for you,make sure to use the promo codes.
**Orders need to be placed via the website and paid with debit or credit

Tomorrow: Eyebrows

Monday, November 26, 2012

Makeup Tip: Applying Foundation


Welcome to my short blog series filled with makeup application tips courtesy of of Mary Kay and my awesome consultant, Kenzie! This quick series will cover foundation application, highlighting and contouring, blush, brows, and eyes and the best part is that Design Your Dwelling readers will receive an offer that is just for you!  It's going to be fun!

To start, let's talk foundation.  I never used to wear foundation because I hated feeling like I had all sorts of makeup caked on my face but once I learned how to apply it correctly, it all came together and now I don't mind wearing foundation.  Did you know that foundation is also part of a skin care routine?!  Yep - it's another form of protection for your face from the environment.  Crazy!

Here is what you need to perfectly apply foundation:


Start by applying a small amount of foundation primer to your face.  The primer helps to fill imperfections and  extend the wear of your foundation.  The primer truly does work, I was too lazy to wash my face before bed and no foundation wore off onto my pillow - AWESOME!

Next apply foundation (I use beige 4 in luminous wear) in four spots on your face as shown below.


(By the way, this is my "before" picture.  I'm not wearing any foundation and I have to admit my skin looks pretty good.  Kenzie helped me with my skin care program and I love it! )

Next, use the foundation brush and start applying the foundation from your nose to the outer parts of your face.  If you use the primer, you wont need much foundation.


Unfortunately I didn't take an after picture. :(  I will tell you that starting with a perfect, blank canvas is awesome and definitely helps increases my confidence because I feel like my whole look is pulled together perfectly!

Here is a quick reminder of the products I used with direct links to the product!


Specials ONLY for Design Your Dwelling readers - that's you! :)

CYBER MONDAY SPECIAL:  Buy 1 item, get 1 item HALF OFF by shopping on her site: www.marykay.com/kenz.kral  use MONDAY as your promo code. (Cannot be combined with DYD reader special.)

DYD READER SPECIAL:  10% off your total purchase, use the DYD as your promo code. www.marykay.com/kenz.kral (Cannot be combined with cyber Monday special)

FREE SHIPPING:  Automatic free shipping on orders of $20 or more!

*You wont see the discount when it's it your basket, Kenzie will apply it for you,make sure to use the promo codes.
**Orders need to be placed via the website and paid with debit or credit

Tomorrow: Contouring & Highlighting

Friday, November 23, 2012

High Five For Friday!


Happy Friday!  I hope everyone had a great Thanksgiving - I did! :)  

1// The December Birchbox arrived!  Great stuff this month including a chocolate covered potato chip and a full tube of mascara! :)

2// Coupons have been coming in the mail daily!  They are almost as good at "real mail!"

3// Last week I went to a great Mary Kay color session that was full of tips and techniques!  We captured nearly all of it on camera so next week I'll be posting make up how-to's, Mary Kay specials and a giveaway! Stay tuned...

4// Diet Sunkist.  Everyone once-in-awhile I crave one of these.

5// The December edition of BHG came!  My favorite part of the magazine this month was the great gift-giving ideas.

Have a fantastic weekend!!

And don't forget, I'm linking up with Lauren at From My Grey Desk!

Photobucket

Wednesday, November 21, 2012

Wedding Wednesday - Choosing a Color Scheme

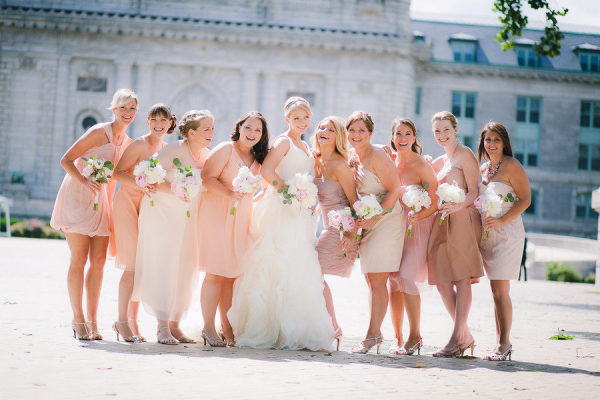
Wedding colors! Who doesn't have a vision in their mind for what they want their wedding colors to be?!  I remember seeing a wedding party where the bridesmaids were wearing coral dresses and the guys were wearing khaki suits and fell in love with the look! Based on that inspiration pinks, corals are some of my favorites and neutrals and grays also make the top of the list.  Yep - that's a lot of colors but I think there is a way that they can all be used.

The colors a bride chooses are primarily used as bridesmaid dresses and complimented with flowers and table decorations so take  into consideration how and where you will use your colors when making a decision - it's kind of like decorating a room...

Here is a look at the color schemes I am trying to decide between!

Pinks & Corals


via

Via


With...
Via


Grays &  Neutrals

Via

Via


With...

Via

You have probably seen these color schemes (and dress combinations) all over the internet so they look "over-done."  At least that is what I thought until my sister asked me, "Have you ever been to a wedding with that color scheme?"  The answer was "no." Lesson learned!  Before you make a decision, think about the weddings you've been to recently to recall if anyone has done anything similar to what your considering. Even if they have done something similar, who cares!  It's your big day! :)

One more thing, if picking out a color scheme is somewhat difficult for you I recommend two things to try:

1. Go to Style Me Pretty and look up bridesmaids.  They give you color schemes!  Once I make a decision my bridesmaids will get a copy of the color scheme from this website to choose their dresses.

2. Try out the Sherwin Williams "Chip-It" tool.  It's easy to use and pulls up a color scheme from a photo.  I use it often for my design boards.

I need your help!  Which do you like better - They greys or neutrals with pink & coral flowers or the pinks and corals with green flowers?  Leave a comment and let me know!

Tuesday, November 20, 2012

Take-Home Thanksgiving Recipe Booklet + Guest Posting

Good Morning!  Can you believe the holiday season begins in less than two days?!  Yikes!

Today I am guest posting over at Fischer's Finds to share Last Minute Thanksgiving Decor ideas - please stop over to check it out.  I did some research and found some great, easy ideas in case you are hosting.  But, before you head over to check out those ideas, I have one more Thanksgiving idea to share with you and it's my favorite!

I came across this cute idea for take-home recipe booklets in the November issue of Better Homes & Gardens and decided to re-create it!


Seriously, how cute and handy is this idea?! 

So much good food is served at Thanksgiving and there are so many great recipes I have always wanted to get like my aunt Diane's corn bread, my aunt Lori's sweet potato casserole with candied nuts and my mom's homemade bun recipe, to name a few.  You could easily turn your holiday feast into a mini recipe exchange.  OR if you are cooking the whole meal and using recipes that you know will be an instant hit, you could type all of your recipes, print and bind them really quick and offer them to guests as a party favor!


Here's what you need:
Construction paper
White printer paper
Labels (I used Martha Stewart labels)
Stapler
Marker
Ribbon
Glue dots

Ready for the super easy instructions?!  

1. Cut all of your paper in half, lengthwise.
2. Put your white paper on top of your construction paper and fold in half.
3. Staple the folded end to hold the booklet together.
4. Tie a ribbon over the staples and secure with glue dots.
5. Stick a label on the front.
6. Write your message!


Enjoy!

Don't forget to stop over at Fischer's Finds to get more great last minute Thanksgiving ideas!


Friday, November 16, 2012

High Five For Friday


Hello Friday!  I have waited all week for you!  Even though some pretty great things happened.... :)

1. My mom found all of my FFA jackets (all 4 of them) and returned them to me.  For those of you that think they are fashion, they aren't.  They are symbol of progress and leadership in agriculture worn by representatives of the worlds largest youth leadership organization.  Anyhow... the pockets were filled with so many memories of events, opportunities and friends I met while wearing these jackets.  

2. I loved my Saturday morning.  Coffee and my HGTV magazine!

3. I got my hair cut and colored last week.  It doesn't look a whole lot different than normal but I love the feeling of a great haircut!

4. My pig has arrived!  I am participating in a Paint-A-Pig fundraiser.  Here is the piggy I will be painting.  (Ideas welcome!)

5. Once in awhile, at the end of the day, Adam and I crack a couple of Bush Light's and talk about what's on our minds.  It's fun and great conversation with the one I love! :)

How has your week been?!  Remember to find the good!

As usual, I am linking up with Lauren at From My Grey Desk!

Photobucket

Thursday, November 15, 2012

Bathroom Cabinet Organization

I'm a little embarrassed to share this on the world wide web but for those of you who think my house is in perfect condition, this post is for you!

My bathroom cabinet was in desperate need of cleaning and organization!  Can you believe this disorganized mess?!  Ahhhh... embarrassing!


This cabinet is HUGE!  When we moved into the bathroom after the remodel I just put things in the cabinet without any sort of organization.


After all of the construction we have been doing on our old farm house we have accumulated a little dust.  Kinda icky and a lot embarrassing!  Thank goodness my mom doesn't read my blog very often, she would wonder if she raised me right.


And since we need to have two of everything on hand at all times (insert sarcasm for my "other half"), the cabinet became a little cluttered.  So,  I decided to tackle this project the night of the presidential election!  I'm not one to sit and watch the polls...


Holy smokes we have a lot of stuff! Thank goodness we opted for a lot of counter space in our bathroom. :)

After about an hour, this is what the cabinet looked like.


Way better, much cleaner and definitely more organized thanks to my finds at Home Goods the previous weekend!  


I scored these sweet wire baskets at a Home Goods in Burnsville, MN!  I wasn't quite sure what I was going to do with them when I spotted them but I knew I'd figure out something!  Ta - da!  Totally worth the buy to help wrangle the mass amount of extras we seem to need on hand!


I also scored this jar at Home Goods.  I really had no clue what I was going to use this for, I just liked it!  But, it's making a good container for all of my travel-sized items!  

Again, kind of embarrassing to share but I wanted to bust the myth that my house was always clean and organized! :)  

Have a great Thursday! 

P.S. If you want to see the bathroom remodel before pictures click here.  If you want to see that final project click here.


Wednesday, November 14, 2012

Master Bedroom Design + Guest Posting

I know, I know... it's Wednesday so I should be sharing a Wedding Wednesday post!  This week I am taking a Wednesday off from Wedding planning and sharing one of my recent projects with you - this master bedroom design for my dear friend, Kelly, in Wisconsin!

(Out of respect for my clients, I do no share item source list)

It was so fun to work with Kelly, she has great taste and was open to trying some new ideas and bold patterns!  Her goal was to create a retreat for her and her husband that promoted relaxation.  She liked cool coastal colors, a variety of textures, and modern patterns.  This is the look we came up with for her master bedroom retreat! :)

If you would like to update your space or have a design board created specifically for you, check out the design services page, or send me an email designyourdwellingblog (at) gmail.com.

Also - I am guest blogging for a new real estate blog in Northern Iowa called Fischer's Finds!  My first post was published today!  I am giving readers some tips for creating a guest bedroom retreat in preparation for the holidays!  Head over to Fischer's Finds to check it out!

Have a great Wednesday!  Wedding Wednesday's will be back next week!!

Friday, November 9, 2012

High Five For Friday


I'm back for H54F after missing last week!  :)

1. Last weekend I went back to Minnesota to hang out with one of my very best friends!  We enjoyed some great wine during a fun night out! The only picture I took was of our broken wine glass... yes we had fun! :)

2. Yum... Heath flavor from International Delight for my coffee!

3. I love opening up a new tube of mascara!  Mary Kay Ultimate mascara is my absolute favorite.  Click here if you want to order your own from a great consultant! 

4. Have you seen this?!  Jack Daniels marinade in a bag is awesome and super convenient!  I've found it in Walmart and Target.  It is a great marinade for pork loin.

5. Look at these two handsome guys!  Both had a great time pheasant hunting over the past two weekends! I love when people have so much fun doing something they enjoy!

I hope you've had a great weekend!  If you are stopping by From My Grey Desk Blog - thanks for saying hi and I hope you stick around for awhile! 

Make sure to stop over at Lauren't blog to see more H54F posts! 

Photobucket

Wednesday, November 7, 2012

Wedding Wednesday - Tips for Choosing a Wedding Theme

Seriously, I am no expert on planning a wedding but I thought tips for choosing a wedding theme would be an appropriate post for two reasons.  First, I keep getting asked what my "theme" is and second, the wedding checklist in my wedding planner said I should should select a theme 10 months before the wedding. :)

So, I did some research on wedding themes and took into consideration how I selected our theme and came up with these three tips! (Fortunately, my fiance is leaving these sort of details up to me!)

1 | Your Theme Should Reflect Your Personal Couple Style
I totally agree with this.  If you choose a theme, it should reflect your personal style.  Is your relationship simple? Fun-loving? Do you and your finance love to travel? Are one of you from another country and incorporating multiple cultures into your wedding?  Think through this some and see what you come up with!

2| Make Sure Your Wedding is Timeless
Have you ever looked back on something you've done and said, "why did I ever wear that?" Think about this when selecting your theme!  Rainbow colors have had their moment in time...

3| Consider  Your Budget
This is tough because it is hard to resist every idea or item related to your wedding theme.  Take into consideration your budget and figure out what is most important to you and your fiance on your wedding day!  We considered a destination wedding, but it didn't fit the budget knowing we wanted to have a fun party to celebrate with all of our friends.

The benefit of having a theme is it brings some cohesiveness to your wedding from the ceremony to the reception!

One last thought on themes... just because you are getting married close to a holiday, don't feel like your wedding has to reflect the holiday theme.  Instead, do what you want! :)  (If I was having a winter wedding, I would probably still choose pink or coral!)

So... what's our Wedding theme?!  Vintage Meets Modern!

I love the colors of vintage and some of the elements, like lace and wire baskets, but I know that vintage is a trend right now.  I have no interest in doilies, feathers or old-fashioned cameras and ice cream.  That's where modern comes into play!  I love the clean lines and geometric prints and typography that say "modern" and I would say that modern fits our personal style!  I must admit, we are pretty "with-it" couple! :)


Vintage colors/modern dresses

Wire Baskets w/modern labels

Vintage Inspired Garters
Vintage lace garters


Invitations
Modern, Geometric invitations

Cute wedding program. I like this because I'm always trying to figure out who is who.
Un-traditional program

I have a vision to combine the two styles and make it a day that everyone enjoys, reflects our personal style and fits within our budget!

Bottom line: We're just going to go with things we like and make sense for us - if they relate to my Vintage Meets Modern theme - awesome!  If not, well, that's ok because it's something we want!

Thanks for stopping by and have a happy hump day!

**All pictures are from Pinterest or Style Me Pretty, none are original photos of Design Your Dwelling.

LinkWithin

Related Posts Plugin for WordPress, Blogger...