Monday, July 30, 2012

My "Want List"... Lately

Happy Monday!  Did you have a great weekend?  We went to an Eric Church concert this weekend and had so much fun - I would like to say it was "awesome" but I'm convinced I would only say that about a concert if I was standing in the front row.  Regardless, I like his music a lot and would go to see him again.  I'll share a few pictures as part of my 5 on Friday post.

Today I thought I would share my "want list" with you!  Blogging and my love for interior design and DIY have introduced me to so many awesome things and ideas that I am starting to keep a want list.  This should help me to easily form my Christmas and Birthday wish lists! :)  So, here are a few things on my "want list" lately...

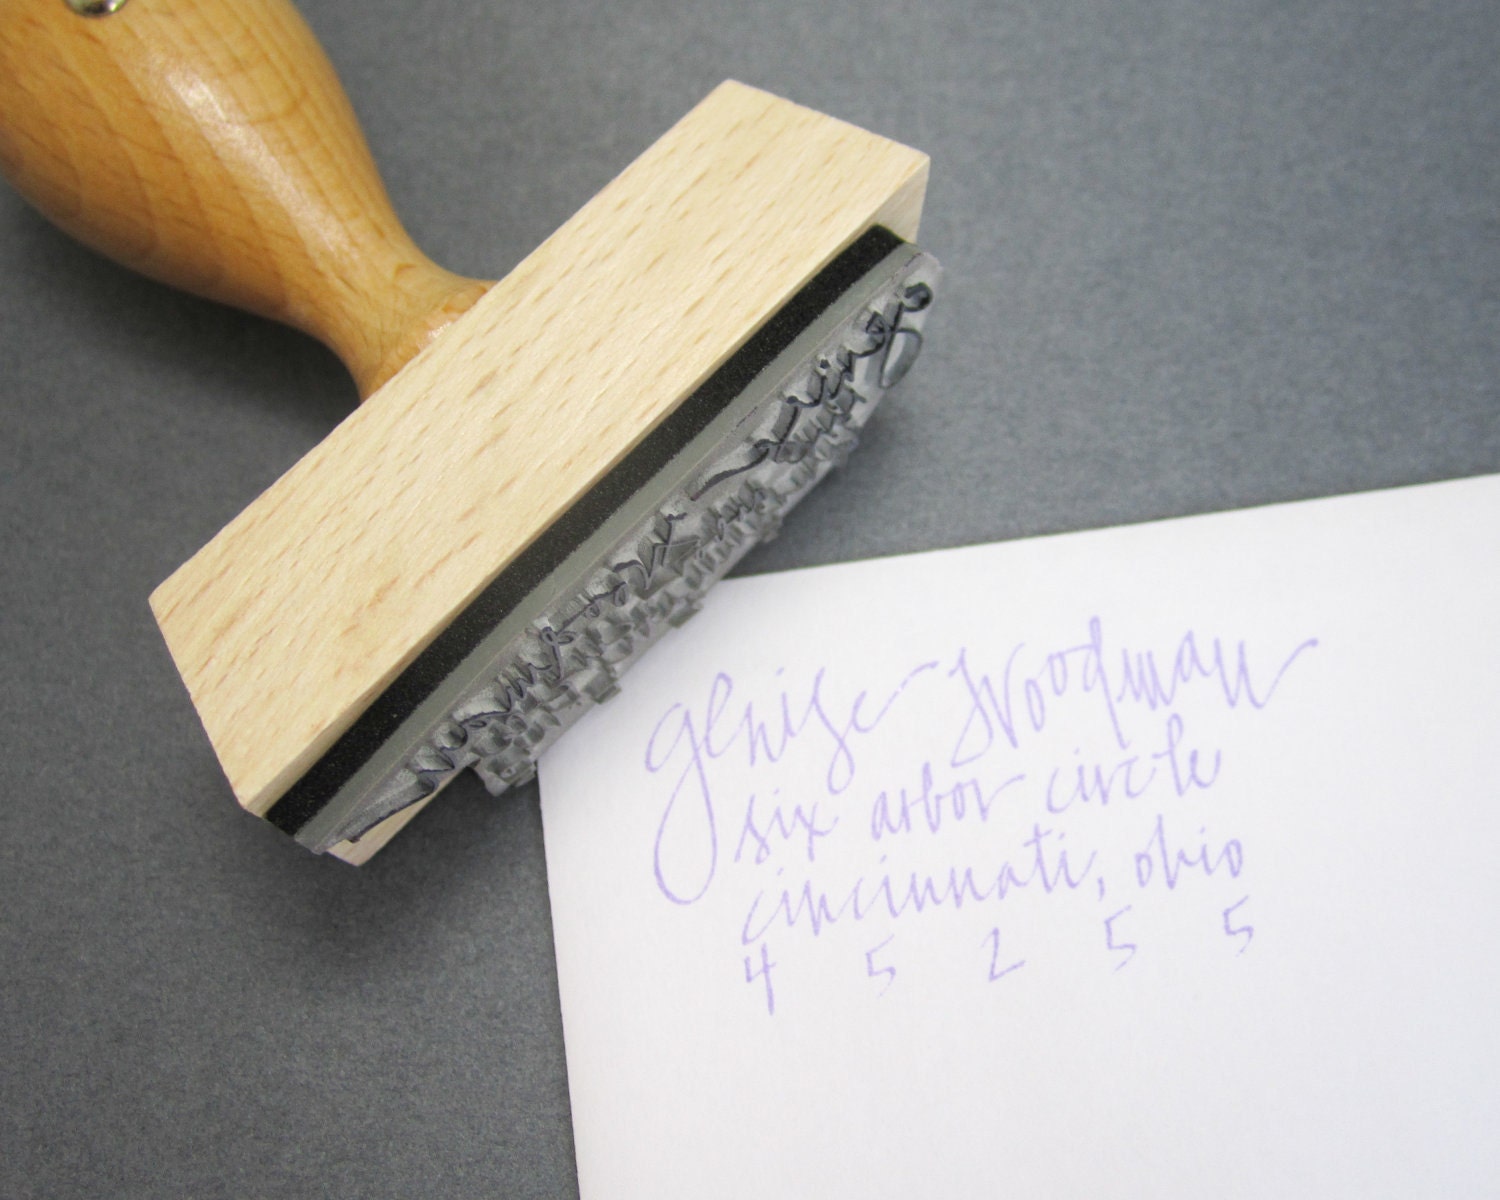
Custom Address Stamp

Custom Address Stamp - 2 1/4" hand calligraphy return address rubber stamp - personalized
Via Papersushi on Etsy


LOVE this!  These would make a great wedding or house warming gift!  Either way, I definitely want one because I like sending snail mail and I hate writing out my return address when I pay bills.

Kellan Rectangle Tote from Pottery Barn
Via Pottery Barn

My vision for this wire tote is to hold extra blankets and pillows in my living room.  I didn't realize wire totes are so hard to come by.  Not sure I'm ready to spend $99...

Home Design by Sabrina Soto
Via Amazon


I really like Sabrina Soto and have always watched her shows on HGTV!  I took a sneak peek at this book and know that I could get sucked in!  You can find it on Amazon.com for $12.04!

If you are curious about any of my "want list" items, click on the caption under the picture for the direct link!

What are you wanting lately?!

Friday, July 27, 2012

5 on Friday!

It's finally Friday!  I am really looking forward to this weekend because we are going to an Eric Church concert.  I love his music and I can't remember the last time I went to a concert.  The best part is the concert isn't far from home so there are so many people going that we know!  It's gonna be fun!  Besides that, here is a recap of great things that happened this week...

1| Girls Night Out
I invited over the two fantastic summer interns that are working on our sales force training team for a little girls night out.  I made dinner and my friend Kenzie, a Mary Kay consultant, came over to talk skincare and make-up.  I'm excited to get my new TimeWise Microdermabresion set and two new mineral eye colors - Gold Coast and Truffle.  Kenzie is great, if you are looking for any products - check out her website by clicking here.  Plus she always offers FREE shipping!


2| High of 86ยบ Today
It has been in the 90-100+ degree range here in Iowa for a couple weeks now.  Today's high is only 86, that is like 20 degrees cooler than "normal." We need the relief from the temperatures - the animals, the crops, and us!


3| New Camera
I am getting a new toy today!  A Cannon EOS Rebel T3i.  I've wanted a nice camera for awhile but I'm too cheap to buy one but I'm finally giving into my "want."  One of my goals is to take better, more high quality pictures.  This is a big investment for me so hopefully you will be seeing more pictures on my blog!


4| He's Home
Adam is back from RAGBRAI (Regsiters Annual Great Bike Ride Across Iowa).  As much as I like have time on my own, it's always great to have him back!  We've dated for 2 years now and I'm still excited to see him after we are apart for awhile - it's a good thing! :)


5| Training Session 101
Besides my love for home design and DIY I also enjoying my role working with a training group and facilitating workshops whether they are product knowledge training workshops or sales training.  This week I facilitated a workshop on how to be a good facilitator.  I had a great time with the participants and I'm pretty confident they took away some good "nuggets" to lead their next training session.  My number #1 rule for training is to have fun. 


There are my top 5 for the week! I hope you all have a great weekend a remember to find excitement in the every-day things!

Tuesday, July 24, 2012

{DIY Project} Monogrammed Post-It Notes

I continually have quick little DIY project ideas running through my mind so my project list continues to grow.  Last night I finally made the Monogrammed Post-It notes that I been wanting to - I'm in love with monogrammed things lately!  There were no good shows on TV last night and Adam is gone for the week so my free time equals my creative time.

Aren't these cool?  And they are super simple - I think I was done with both of these in 10 minutes!


Here is all you need:
1. Clear or Rubber Stamps
2. Clear Stamp Mount (if using clear stamps)
3. Ink pad (color of your choice)
Don't forget your post it notes!

All you need to do is stamp the letter on each page of the paper!  Simple, huh?!  These make great gifts and additions to personalized stationary sets.  If you don't want to use letters, use any stamp you want!

Have fun!


Friday, July 20, 2012

5 on Friday

Finally Friday - Woohoo!  It's not that I don't like my job, there is just something about Friday that is laid back and relaxing and I love that.  I'm also looking forward to the weekend!  My parents are coming down to visit and Adam will be celebrating a birthday - still no idea what to get him so suggestions are welcome!

I haven't done a '5 on Friday' post in awhile so I was reminded that I have a lot to be thankful for!

1} Lunch Date
My dear friend Melissa who I haven't seen in SO long was driving through Des Moines on her way home from a work trip and stopped to have lunch with me.  It was so kind of her to think of me!  Conversation was great and I am happy to hear that she is enjoying life.  I probably could have spent all afternoon catching up with her.  Thanks Melissa!


2} I Conquered some HTML code
Did you see the updates to my blog design?  I'm pretty proud of this!  For those of you that know HTML code, you are probably laughing at the pride I am taking in this but for those of you that don't, it's rather painful.  Thankfully I found some good tutorials to help me get the job done!

3} Cattle Photographer Extraordinaire 
Kidding!  I'm not great at taking pictures - one of my goals is to improve my photography skills.  We have a couple of heifer (girl) calves that we are hoping to sell as show heifers so we had to take a few pictures to get them onto a local sale.  We spent two nights trying to photograph these little buggers.  I think we came out with some pretty decent pictures!  (These weren't the pictures we submitted - instead I am sharing my favorites)


4} New Shoes
When I get a picture of something I want in my head, I have to have it.  I saw a pair of wedge sandals a friend was wearing on Facebook and finally found a similar pair which are exactly what I was looking for!  Click here to see them! 


5} Haircut & Color
Today is a big day - I am FINALLY getting my hair cut and colored.  The last time I got a real hair cut was April and the last time I had my hair colored was February.  I am going to Salon W in downtown Des Moines.  From what I've read it is one of the top 200 salons in the US.  In my mom's words "Sounds Expensive!"  Yep it does, but a girl's got to treat herself once in awhile.  (I've started to get used to "blah" hair so I'm a little nervous about getting it cut today)

What are the best things that have happened to you this week?  Have a great weekend everyone!

Wednesday, July 18, 2012

DIY Project: Bulletin Board Clips

This pas weekend I decided to take on a few DIY projects.  I haven't really done anything crafty in awhile and it was hot outside so I retreated to my office space and made these cute little bulletin board clips that have been on my to-do list for awhile.  


These are super easy to make and will go great in my new cubicle at work. (Nope, not a promotion :( just re-organizing our floor.) 

Here is what you need:  Mod Podge, thumb tacks, super glue, paper scraps, and clothespins.


Step 1} Cut the paper to the size of the clothespin.

Step2} Use a small sponge brush to apply a light layer of mod podge to the clothespin and lay the paper on top. Let it dry for a minute or two.

Step 3} Add a layer of mod podge to the top side of the paper.  Repeat this step at least 2-3 times allowing the mod podge to try a minute or two in between applications.

Step 4} Once the mod podge is dry put a little dot of super glue on the back of the clothespin and attach the thumb tack.  Let this dry.  You could use magnets too if you want to put them on your fridge!

One piece of advice - buy the higher quality clothespins.  The cheap-o Walmart version don't cut it.

Ta - Da!  You have your very own pretty bulletin board clips!


Like I said - these will work great in my new cubicle and on the bulletin board I created. Click here to see that project.  I'm thinking they would also work well as "welcome to the office" gifts.  I may try to use rubber stamps to add words like to do, file, mail, for fun... and use them as organization clips.  We'll see... 

Enjoy!

Monday, July 16, 2012

A Few Updates To My Blog

This weekend in Iowa was H-O-T.... again.... So instead of spending a lot of time outside like we normally do on the weekends, we spent most of our time indoors in the air conditioning.  The good thing that came out of staying in the house was that I finally spent some time updating my blog and on a few crafty things! :)

I'm sure you noticed a few changes around here!  I wanted to freshen it up and make it look a little brighter than what it was.  I re-designed the header, changed the sidebar titles and my picture (ok - it's a little out of date but I'll get a new one eventually), found new social media icons, and added an E-Design page to my blog!  (More to come on E-Design Soon!)

I'll admit I am not the most computer savvy person in the world, in fact, not really at all but I am pretty proud of myself for conquering HTML code.  Thankfully, there are so many great tutorials out there for editing your blog.  The tutorials I found that worked best for me were on Living, Laughing and Loving and Kevin and Amanda.  

I have a few more updates I need to make to my pages and I really want to build custom post titles.  If anyone knows of a great tutorial for building custom post titles PLEASE let me know!

Now that I know how to make these changes on my own, you may see more updates here and there. 

Have a great Monday everyone!

Thursday, July 12, 2012

Find Me On Facebook!


Hey Everyone! As of late, I have really started using the Design Your Dwelling Facebook page more so I want to invite you to become a follower of Design Your Dwelling via Facebook (and of course of my blog)!

On the Facebook page you will find decor and decorating tips, sales, favorite blog posts, links to DIY articles, inspiration, and more posted daily!

Click here to visit the Design Your Dwelling Facebook page and become a fan!

See you there! :)

Wednesday, July 11, 2012

Simple Supper Recipe - Mini Meat Loafs

If you are from the rural midwest you call your evening meal "supper", not dinner!  Last night Adam was helping out a neighbor so I was on my own to make supper.  Summer meals are usually a tough decision since we eat lighter and cook more on the grill.  Unfortunately I am not a grilling expert, in fact grilling kind of scares me, (grilling is Adam's specialty) so I had to come up with an alternative plan.  I found this simple supper recipe for mini meat loafs on Pinterest.

Make meatloaf in a muffin pan- it cooks in 15 minutes! (Thank you Rachel Ray).  Then 'frost' them with mashed potatoes- i think this may be dinner tonight

This is a super simple recipe and only takes 30-40 minutes max!  Click here for the original recipe from the food network by Rachel Ray.

I made a few modifications to the ingredients but followed the same overall instructions.  Here are the ingredients I used:

Meat Loaf
2 lbs ground beef
Small onion
Half green pepper
1/2 - 3/4 cup Instant Oatmeal
1 egg
Lawry's salt to taste
Pepper to taste
Grilling season of your choice to taste

Mix all of these ingredients together and divide into a muffin pan.  Bake at 450 degrees for 15 minutes.  After 15 minutes I took the mini-meat loafs from the oven and put the sauce on top of them (ingredients listed below) and put them back in the oven for 5 more minutes.

Sauce
Ketchup
brown sugar
pepper

Mix these ingredients together in whatever proportion you want.

I kind of wondered what Adam would think about this new recipe but he loved them.  We agreed they are better than a single meat loaf because they don't get dried out.  Plus, for those of you that have kids I think this is a great idea!  If my  mom made meat loaf like this when I was a kid, I probably would have liked it better.  Haha! :)

For other recipes I like, check out my Pinterest board titled 'Yum'! Enjoy!


Tuesday, July 10, 2012

How To Create A Global Look

A global look is definitely a design trend lately and I am really beginning to love this look plus it is SO simple to create.  Here are a few design boards I created to get you thinking and a few simple tips for how to create a global look in your home.  


(Click on the pictures to enlarge them)

1. Use Rich, Bold Colors
A global look uses rich bold colors in the designs.  Try a chair, side table, or pillows to add these colors.  An area rug will add these beautiful colors also!

2. Add Shine
Next, add shine to the look by adding a floor or table lamp, or metal side table. 

3. Texture & Pattern
This is the easiest and most fun to add to this look.  Lamp shades, side tables and lamp bases easily add texture to the design while pillows add pattern.  When I think of creating a global look, I think of damask, ikat and small floral prints.  An area rug is an easy way to add these two elements also!

If you have a global look and feel to your home - please send pictures, I would love to see it and share them on my blog.  If you like this look and would like help creating this look in your home, let me know, I would be glad to help you out!

Have a wonderful Tuesday!


Friday, July 6, 2012

Outdoor Porch Pillows: Vote for your favorites!

I am going give our front porch a little spruce-up by adding some outdoor pillows.  Originally, I wasn't going to spend the money to add them, but I've found that we are out there a lot on summer nights.  Plus - it is a great place to entertain and the first impression of our house.  So, I'm giving in and making the purchase.

I need your help though!  I am a terrible decision maker when it comes to choosing accessories so I need you all to help me decide which pillows to get!  I've narrowed down my choices to 9 (that's still a lot but I narrowed it way down).   

Here they are - please leave a comment below with the number of your selection(s) or vote on the Design Your Dwelling Facebook page by clicking "like." If you feel strongly and want to vote multiple times - please do!  My plan is to have two different styles that compliment each other.


Here is a look at my outdoor furniture for reference.  Pretty basic against a grey house so anything will work!  (The star in the back will be replaced so no need to take that into consideration)


Thanks for your help! :)

Tuesday, July 3, 2012

Outdoor House Cleaning

As most of you know I live on a farm in rural Iowa and I love it!  Ok well, there is one thing that I don't like... flys and they have attacked the front of our house!  I guess they come with the territory so I'm going to have to live with it.  I couldn't stand how our house looked anymore so I decided to clean it - which hasn't been done at least since Adam has lived there (4 years) so it was pretty bad!  

Be prepared the next few pictures are absolutely disgusting!


Yep - that's four years (at least) of fly poop on our house.  I told you it was disgusting!

Here's is what I used to clean the outside our house.


The dish soap and water didn't really work but it was probably good to scrub the house with it anyhow.  The magic formula was the scrubbing bubbles - I swear by this stuff!  I sprayed it on the house and used the car washing brush to scrub it. Then I took the garden hose and rinsed off the house.  If your house is as bad as ours, don't be surprised if you have to go through the spraying and scrubbing process twice! I also cleaned all of the windows with Windex... a lot of Windex! 

It only took 2 hours but the result was so worth the time spent!


Can you believe the transformation?!  I am totally ready to host a little porch party now!


LinkWithin

Related Posts Plugin for WordPress, Blogger...