Showing posts with label wall hangings. Show all posts

Thursday, March 14, 2013

New Nightstand Print

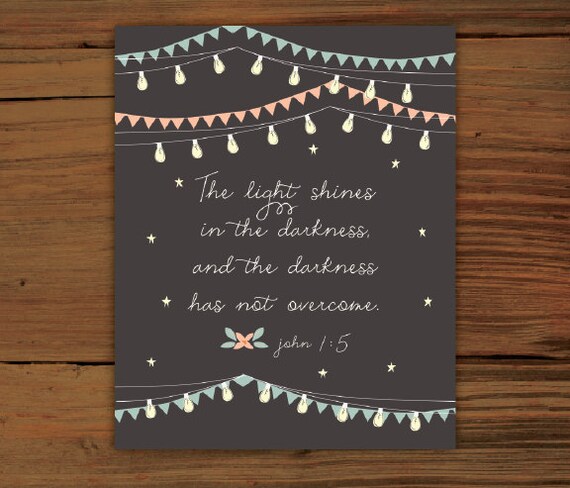
I came across this print from a blog that I follow, French Press Mornings, and knew that it would be a perfect fit for my nightstand because I like the bible verse and the print!


Here is the original print.  You can purchase it in the French Press Mornings Etsy Shop. She has some other great prints there too.  I think I will be getting another one for the other side of the bed! :)

John 1:5 8x10 Poster Print

It's encouraging. I love it! :)

Follow on Bloglovin

Tuesday, September 11, 2012

House Updates

This weekend I made a few updates around the house! (It would be a miracle if I would leave things the way they are for more than a few months at a time...)  Here is a look at what I did!


Red Pillow: Target | Wicker Baket: Gordman's | Wicker Art: Pier 1

I have been wanting a round wicker basket to hold blankets and pillows in the living room and I found this one at Gordman's for $25!  I was sold!  


Silver Bowl: Target | Decorative Balls: TJ Maxx

Call me crazy but I have wanted these "decorative balls" (correct term?) for awhile and I finally found some so I switched up my table centerpiece from a large vase of flowers to these! 


Pocket Board: Kirklands | Metal Vase: Kirklands | Vintage Memo Holder: Decor Steals | Table: Target

In our kitchen we have this "collect-all" nook that use to have word art hanging above it.  I've wanted a bulletin board so we could quickly locate our "must not lose" items and found this board instead! I feel a little more "picked-up" now.


Mirror: IKEA | Frames: Michael's

In the living room I changed up our wall art.  I framed a few things I had on hand.  A coaster from our vacation and a page out of a inspirational quote book to add more color.


This is my favorite update!  I framed this coaster from the restaurant we went to the night Adam and I got engaged.  It's such an appropriate piece because it has meaning and we have cattle.It is my only piece of meaningful art! Plus it just looks cool!  I don't collect much but I do collect coasters from restaurants and hotels I've been to.  For me they tell a story, they are free, and they are usable!

Have a great Tuesday everyone! :)

Wednesday, June 6, 2012

Guest Bedroom Gallery Wall

Good Morning - Happy Hump Day!  I'm glad it's already the middle of the week, we have a weekend trip to San Francisco planned that I'm getting pretty excited for!

I haven't been blogging too much lately but that hasn't kept me from house projects.  I recently created this gallery wall for our guest bedroom!


I also hung this starburst mirror from Target above the dresser to add some extra flair!

Don't let the thought of creating a gallery wall intimidate you.  I had all of these wall hangings from previous houses that I've lived in or had in different places around my current home.  (I can never seem to leave things in one spot for too long.) In fact, I have a clothes basket of random art in my basement.


Before I hung the pictures on the wall, I created the layout on the floor to see if I would like it and to measure the spacing before I started pounding nails.  There is nothing worse than filling nail holes and re-painting!  This was the end result - it added a lot to the large empty wall in the guest bedroom!


If you are interested in where some of these pieces came from here is the list:
Large bird picture: Hobby Lobby
Framed Art - DIY project with matted frame and wall paper sample
Mirror: IKEA 
Cross: Pier 1 Imports

To see the guest bedroom click here!

Thursday, February 16, 2012

Valspar Paint Project + Giveaway

I have been looking forward to this blog post all week!  Recently, Valspar paint contacted me and asked me to do a product review on their new spray paint formula and can design - of course I agreed because I have always had good luck with Valspar paint. 


I also had a few spray paint projects in mind like art work for my laundry room...

Laundry Room Art Using Valspar Spray Paint

My laundry room was pretty bare and since we were adding new storage cupboards I figured this would be a great time to do a little extra decorating.  Here is what I came up with!


[Supplies]
Valspar spray paint (Lowe's)
11 x 14 Canvases (Hobby Lobby)
Letter stencils
Spray Adhesive

[Step 1] Make your stencils
I used my Cricut and the Don Juan and Lyrical Letters cartridges to create my stencils.  If you don't have a Cricut you can make stencils using fonts in Microsoft Word and printing your text on heavy cardstock, then cut out the letters with an exact-o knife.

[Step 2] Position Your Words
Take time to position your words on the canvases to decide where you want them.  Once you have that figured out, use spray adhesive to hold them in place on the canvas.  All you need to do is lightly spray the adhesive on the back of each letter and let it dry for about 30 seconds then re-position them on your canvas. 


[Step 3] Spray Away!
This is the fun part!  I used Valspar spray paint in Tropical Oasis.  I did two coats of spray paint.  The first coat was a very light coat of paint that I let dry for about 5 minutes.  Then I came back and finished up with one more coat.  The coverage was so even and consistant that's all the paint it took!

First Coat

Second Coat

Ta Da!  Here is the final product!


I have to say, the Valspar paint I used was awesome!  The coverage was very even and the continuous spray was definitely a plus.  Not to mention, clean-up was a "piece of cake" too!  All I needed to do was twist and lock the cap and clean-up was done - no drips to clean up or anything.

I had so much fun painting those canvases that I also painted a grapvine wreath using Valspar spray paint in Exotic Sea.  The coverage was still consistant and got into all of the cracks and crevaces that a wreath has without any trouble!


Valspar Paint Giveaway!!
Valspar was kind enough to offer a can of spray paint to 3 lucky readers! Winners will be contacted by email so make sure to include your email in your comment!  Here is how you can get entered to win:  (Separate entry for each)

1] Leave a comment to tell us what your spray paint project will be - find inspiration and ideas at http://www.valsparspray.com/ (+1 entry)
2] Become a Facebook fan of Valspar Paint (+1 entry, leave a comment below)
3] Become a follwer of Design Your Dwelling (+1 entry, leave a comment below)
4] Become a fan of Design Your Dwelling on Facebook (+1 entry, leave a comment below)
5] Share this post via Facebook to let your friends know about this great giveaway & product (+1 entry, leave a comment below)

Giveaway is closed but feel free to leave comments, become a follower and visit Valspar online!
Thanks for visiting! :)

Thursday, January 5, 2012

Gallery Wall

Here it is - the gallery wall I hung in the dining room during my Christmas vacation!  What do you think?!


I love it!  Adam has even commented a few times that it looks great!

I kept the gallery wall pretty simple with clean lines and color consistency amongst all three wall hangings.  I like simplicty, consistency and formality with a contemporary feel.

Two of the wall hangings were DIY projects: the monogrammed wall hanging and the matted flower frame. 
To see how I made these check out these posts:

I've mentioned a few times that I have a hard time buying wall decor because it kind of stresses me out.  But, I did buy the framed sliver "LOVE" print from a shop on Etsy.  Click here to get the Made By Girl Etsy shop.

In case you like the brushed nickel frames,  I found them at Target.

Have a great Thursday,
Beth

Wednesday, January 4, 2012

DIY Framed Art

The gallery wall I've been working on for the dining room needed a pop of color so instead of buying art I made my own framed art.  I think I mentioned in my Monogrammed Wall Decor post from earlier this week that one of the things I struggle with is buying wall decor.  For some reason it kind of stresses me out, so to solve that problem I've started to do a little research on my favorite blogs and Pinterest to find ideas to create my own.

Here is my DIY framed art and the steps for how to create your own!


Supply List:

White 4 x 6 or 5 x 7 note cards
Frame (Target)
Rubber Stamps (Most craft stores or Stampin' Up)
Colored Ink pads or Rubber Stamp Markers from Stampin' Up
Sponge


First, use the stamps to create your art on the white notecard.  I kept mine pretty simple with a single flower stamp.  If you want to get more creative, you can use multiple stamps or stamp sets.  There are so many great ideas on the  Stampin' Up website.  To keep my stamps clean after I'm done using them, I wipe them off with a sponge.


I would be lying to you if I said it only took me one try to get the picture exactly how I wanted it.  It probably took me at least ten trys so don't feel discouraged if your first two trys don't turn out.

Here is my final product hanging on the wall!


I centered the picture in the frame and then attached it with scotch tape.

Tomorrow, I will reveal my gallery wall to you so you can see how it all came together!

See you tomorrow,
Beth


Monday, January 2, 2012

Monogrammed Wall Decor

Today is my final day of "Christmas Vacation" from work which adds up to a grand total of 11 days of vacation - it has been awesome! (It's going to be really tough to go back tomorrow.)  I worked on a lot of little projects around the house during vacation.  One of the bigger projects I worked on was a gallery wall in the dining room.  I am terrible at buying artwork because I never know where to find anything good so I had to make a few pieces to complete the wall. (I'll show you the completed wall toward the middle of the week)

One of the pieces of wall decor I made was this monogrammed canvas. 


This was an easy and fun project.  All you need for supplies is a woodchip letter and canvas.  You can find both a Hobby Lobby.  The sales sticker on the letter didn't come off very well so I had to use sand paper to smooth it out.


I had spray paint left over from my painted vases project that I re-purposed for this project.


When you paint the letter and the canvas, go back and forth in quick spirts of spray rather than in a continuous stream of spray paint until the object is covered.  This will prevent the paint from running and reduce the amount of time it will take for the items to dry.  You will have to give the canvas and the letter multiple coats of paint.

Once the paint is dry on everything, put glue on the back of the letter (tacky glue or hot glue) and center the letter on the canvas.  Let the glue dry and there you go - you have your monogrammed wall decor!

Make sure to check back here for another DIY wall decor idea and to see how the gallery wall comes together!

Good Luck!
Beth


Tuesday, October 18, 2011

Scotch Painters Tape Wall Art

I am the worlds worst at picking out things to hang on my walls!  Thank goodness for this DIY project using Scotch Tape to create your own wall art!


Supplies:
1. Scotch Blue Painters Tape
2. Spray Paint
3. Painters Canvas - Hobby Lobby or Michael's

Supplies

What to do:
1. Create your design using the Scotch Blue Painters Tape
*Make sure the tape is sticking really well to the canvas so the paint doesn't bleed.
2. Evenly spray paint the canvas
3. Allow the paint to dry and remove the tape


Geometric Art

This quick and inexpenisve project is a great way to add some color and visual interest to any room. You can hang it vertical or landscape and even use multiple colors if you want to take the time to paint. 

Good luck and have fun!!


LinkWithin

Related Posts Plugin for WordPress, Blogger...
