Monday, November 26, 2012

Makeup Tip: Applying Foundation


Welcome to my short blog series filled with makeup application tips courtesy of of Mary Kay and my awesome consultant, Kenzie! This quick series will cover foundation application, highlighting and contouring, blush, brows, and eyes and the best part is that Design Your Dwelling readers will receive an offer that is just for you!  It's going to be fun!

To start, let's talk foundation.  I never used to wear foundation because I hated feeling like I had all sorts of makeup caked on my face but once I learned how to apply it correctly, it all came together and now I don't mind wearing foundation.  Did you know that foundation is also part of a skin care routine?!  Yep - it's another form of protection for your face from the environment.  Crazy!

Here is what you need to perfectly apply foundation:


Start by applying a small amount of foundation primer to your face.  The primer helps to fill imperfections and  extend the wear of your foundation.  The primer truly does work, I was too lazy to wash my face before bed and no foundation wore off onto my pillow - AWESOME!

Next apply foundation (I use beige 4 in luminous wear) in four spots on your face as shown below.


(By the way, this is my "before" picture.  I'm not wearing any foundation and I have to admit my skin looks pretty good.  Kenzie helped me with my skin care program and I love it! )

Next, use the foundation brush and start applying the foundation from your nose to the outer parts of your face.  If you use the primer, you wont need much foundation.


Unfortunately I didn't take an after picture. :(  I will tell you that starting with a perfect, blank canvas is awesome and definitely helps increases my confidence because I feel like my whole look is pulled together perfectly!

Here is a quick reminder of the products I used with direct links to the product!


Specials ONLY for Design Your Dwelling readers - that's you! :)

CYBER MONDAY SPECIAL:  Buy 1 item, get 1 item HALF OFF by shopping on her site: www.marykay.com/kenz.kral  use MONDAY as your promo code. (Cannot be combined with DYD reader special.)

DYD READER SPECIAL:  10% off your total purchase, use the DYD as your promo code. www.marykay.com/kenz.kral (Cannot be combined with cyber Monday special)

FREE SHIPPING:  Automatic free shipping on orders of $20 or more!

*You wont see the discount when it's it your basket, Kenzie will apply it for you,make sure to use the promo codes.
**Orders need to be placed via the website and paid with debit or credit

Tomorrow: Contouring & Highlighting

Friday, November 23, 2012

High Five For Friday!


Happy Friday!  I hope everyone had a great Thanksgiving - I did! :)  

1// The December Birchbox arrived!  Great stuff this month including a chocolate covered potato chip and a full tube of mascara! :)

2// Coupons have been coming in the mail daily!  They are almost as good at "real mail!"

3// Last week I went to a great Mary Kay color session that was full of tips and techniques!  We captured nearly all of it on camera so next week I'll be posting make up how-to's, Mary Kay specials and a giveaway! Stay tuned...

4// Diet Sunkist.  Everyone once-in-awhile I crave one of these.

5// The December edition of BHG came!  My favorite part of the magazine this month was the great gift-giving ideas.

Have a fantastic weekend!!

And don't forget, I'm linking up with Lauren at From My Grey Desk!

Photobucket

Wednesday, November 21, 2012

Wedding Wednesday - Choosing a Color Scheme

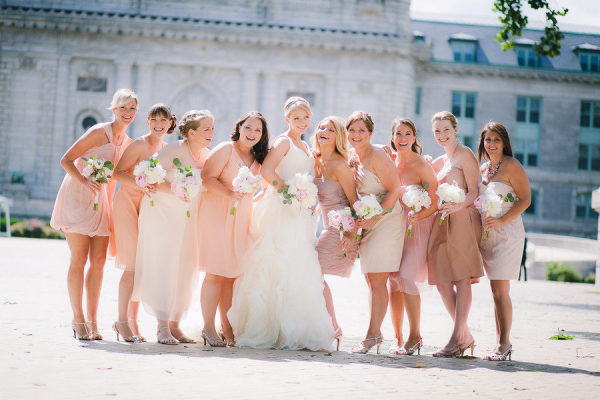
Wedding colors! Who doesn't have a vision in their mind for what they want their wedding colors to be?!  I remember seeing a wedding party where the bridesmaids were wearing coral dresses and the guys were wearing khaki suits and fell in love with the look! Based on that inspiration pinks, corals are some of my favorites and neutrals and grays also make the top of the list.  Yep - that's a lot of colors but I think there is a way that they can all be used.

The colors a bride chooses are primarily used as bridesmaid dresses and complimented with flowers and table decorations so take  into consideration how and where you will use your colors when making a decision - it's kind of like decorating a room...

Here is a look at the color schemes I am trying to decide between!

Pinks & Corals


via

Via


With...
Via


Grays &  Neutrals

Via

Via


With...

Via

You have probably seen these color schemes (and dress combinations) all over the internet so they look "over-done."  At least that is what I thought until my sister asked me, "Have you ever been to a wedding with that color scheme?"  The answer was "no." Lesson learned!  Before you make a decision, think about the weddings you've been to recently to recall if anyone has done anything similar to what your considering. Even if they have done something similar, who cares!  It's your big day! :)

One more thing, if picking out a color scheme is somewhat difficult for you I recommend two things to try:

1. Go to Style Me Pretty and look up bridesmaids.  They give you color schemes!  Once I make a decision my bridesmaids will get a copy of the color scheme from this website to choose their dresses.

2. Try out the Sherwin Williams "Chip-It" tool.  It's easy to use and pulls up a color scheme from a photo.  I use it often for my design boards.

I need your help!  Which do you like better - They greys or neutrals with pink & coral flowers or the pinks and corals with green flowers?  Leave a comment and let me know!

Tuesday, November 20, 2012

Take-Home Thanksgiving Recipe Booklet + Guest Posting

Good Morning!  Can you believe the holiday season begins in less than two days?!  Yikes!

Today I am guest posting over at Fischer's Finds to share Last Minute Thanksgiving Decor ideas - please stop over to check it out.  I did some research and found some great, easy ideas in case you are hosting.  But, before you head over to check out those ideas, I have one more Thanksgiving idea to share with you and it's my favorite!

I came across this cute idea for take-home recipe booklets in the November issue of Better Homes & Gardens and decided to re-create it!


Seriously, how cute and handy is this idea?! 

So much good food is served at Thanksgiving and there are so many great recipes I have always wanted to get like my aunt Diane's corn bread, my aunt Lori's sweet potato casserole with candied nuts and my mom's homemade bun recipe, to name a few.  You could easily turn your holiday feast into a mini recipe exchange.  OR if you are cooking the whole meal and using recipes that you know will be an instant hit, you could type all of your recipes, print and bind them really quick and offer them to guests as a party favor!


Here's what you need:
Construction paper
White printer paper
Labels (I used Martha Stewart labels)
Stapler
Marker
Ribbon
Glue dots

Ready for the super easy instructions?!  

1. Cut all of your paper in half, lengthwise.
2. Put your white paper on top of your construction paper and fold in half.
3. Staple the folded end to hold the booklet together.
4. Tie a ribbon over the staples and secure with glue dots.
5. Stick a label on the front.
6. Write your message!


Enjoy!

Don't forget to stop over at Fischer's Finds to get more great last minute Thanksgiving ideas!


LinkWithin

Related Posts Plugin for WordPress, Blogger...